A Surgical Technique: How to Minimize Scar Visibility & RSTLs
Resting Skin Tension Lines (RSTLs) Explained
It’s Technique Tuesday! This week I am going to discuss the importance of using this ONE technique to help minimize the visibility of a scar when performing facial skin surgery ~ Utilizing RSTLs!
Resting Skin Tension Lines (RSTLs) are natural lines of minimal skin tension that occur when the skin is at rest. These lines form due to the underlying structure of collagen fibers, skin elasticity, and habitual movements of the face and body.
Why Are RSTLs Important in Surgery?
- Minimizes Scarring – Incisions made parallel to RSTLs heal with less visible scars because they follow the skin’s natural grain.
- Reduces Tension – Wound edges experience less pulling, leading to better closure and healing.
- Enhances Cosmetic Outcomes – Scars blend more naturally into the skin’s texture.
- Prevents Complications – Avoids widened scars, hypertrophic scars, or keloids caused by excessive tension.
How Are RSTLs Determined?
- By Gently Pinching the Skin: When pinched, the skin folds along the RSTLs.
- By Observing Facial Expressions: Wrinkles and natural creases align with RSTLs.
- By Using Anatomical Reference Charts: Standardized RSTL diagrams guide optimal incision placement (see diagrams below).
RSTLs vs. Langer’s Lines vs. Kraissl’s Lines
- Langer’s Lines – Based on skin tension in cadavers, useful but not always precise in live patients.
- Kraissl’s Lines – Follow dynamic muscle movement, especially in areas like the mouth and eyelids.
- RSTLs (Most Clinically Relevant) – Defined by relaxed skin folds in living patients and are the best guides for surgical incision planning.
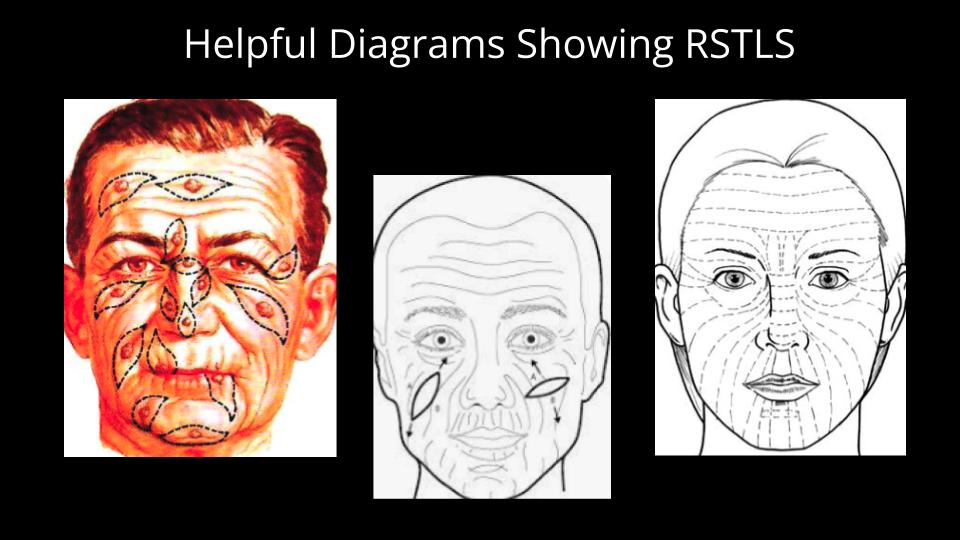
Helpful Diagrams Showing RSTLs to Face for Reference
Understanding RSTL direction for the face is crucial for making surgical incisions that minimize scarring and enhance wound healing. Here are the main anatomic locations on the face and considerations to make when performing facial skin surgery. See the diagrams below for reference:
1. Forehead
- RSTLs run horizontally across the forehead.
- Incisions should be parallel to these lines to avoid noticeable scars.
- Wrinkle lines often follow a similar pattern, reinforcing this direction.
2. Nose
- RSTLs on the glabella run vertically (prompt the patient to bring eyebrows together for better visualization).
- On the nasal root they run horizontally (prompt the patient to "wrinkle your nose" for better visualization).
- On the superior sidewalls they can run obliquely from the inner medial canthi to the nasal tip.
- On the nasal ala, they curve along the natural shape of the nostrils.
3. Cheeks
- RSTLs on the cheeks run obliquely, slanting from the nose toward the ear.
- Near the temple area, crows feet lines are commonly used.
4. Chin
- RSTLs run horizontally across the chin in the mental crease.
- Oblique and vertical lines run laterally to the mental crease and more easily seen as patients age or skin is probed.
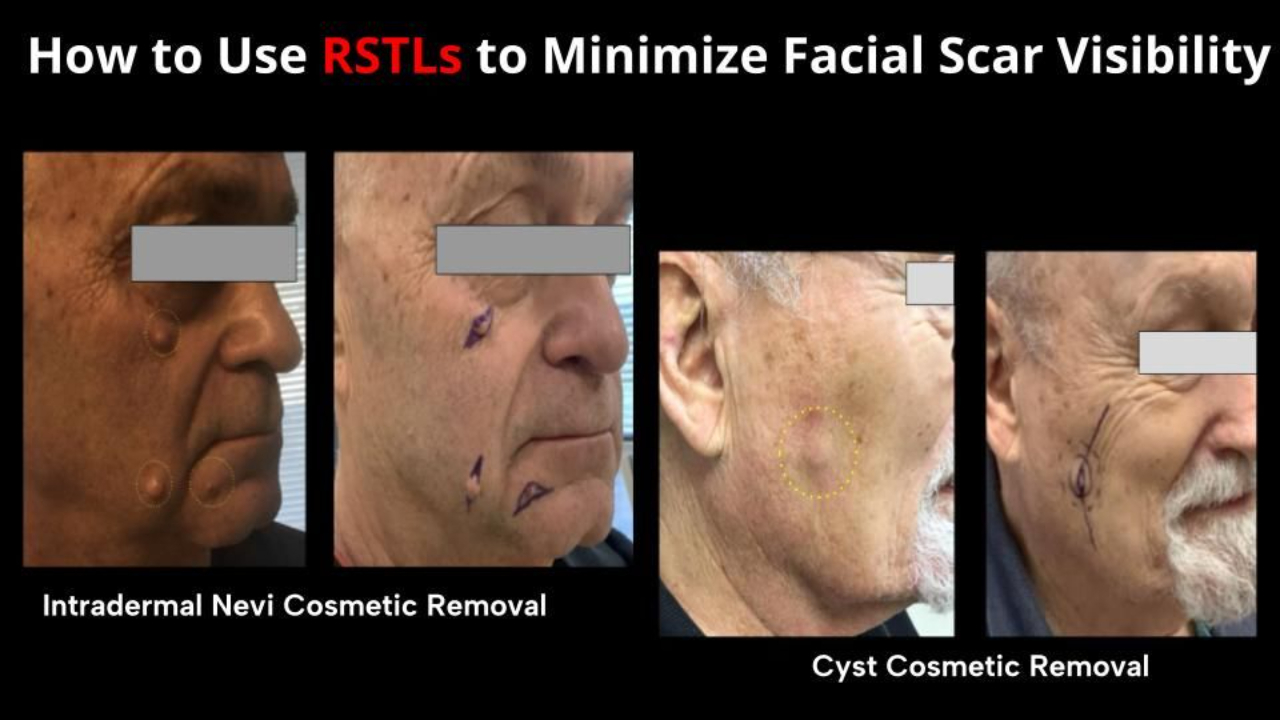
Case Studies and Step-by-Step on How to Excise Benign Facial Lesions Using RSTLs
Here are 2 case study examples showing you step-by-step on how I excised benign lesions per patient requests due to cosmetic concerns.
Take note on how I utilized the patients' RSTLS.
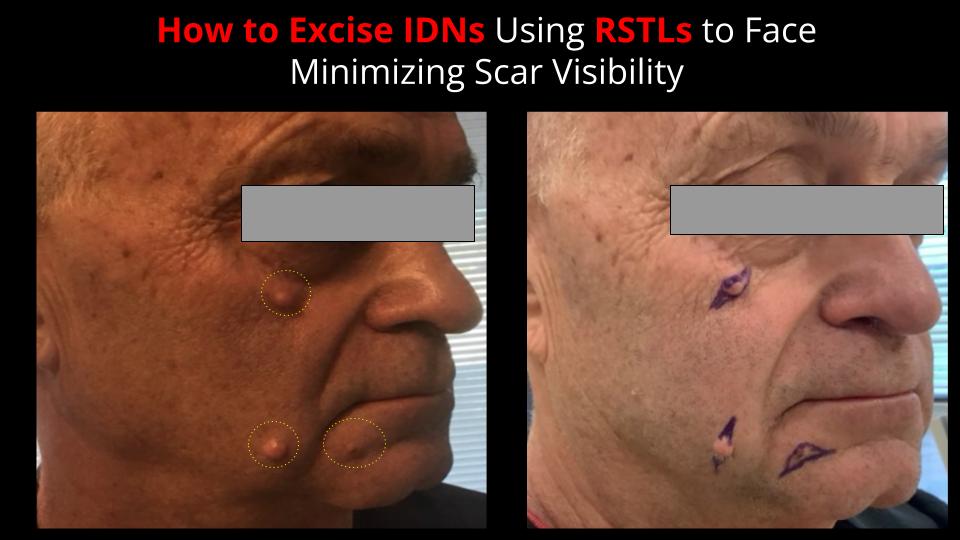
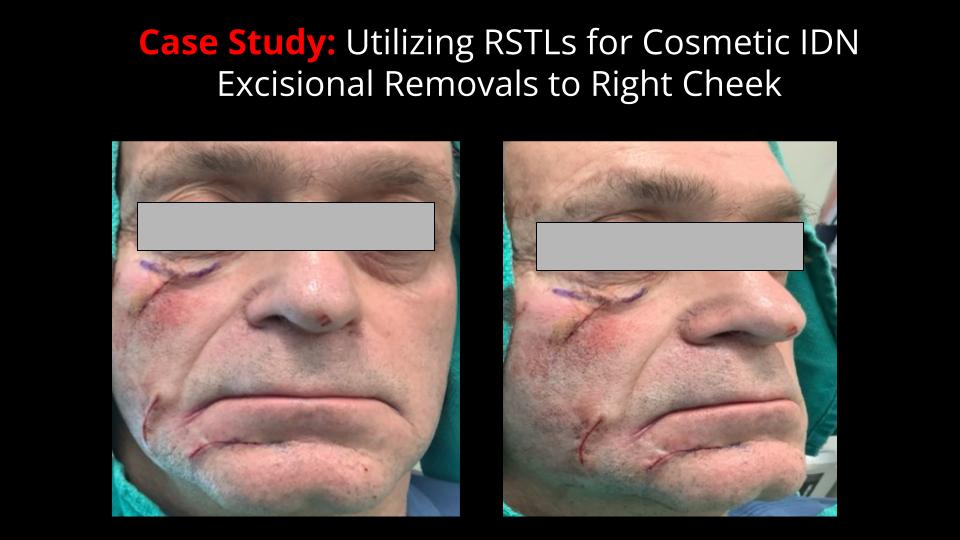
Case Study 1 - Intradermal Nevi (IDN) Excisions
Step 1: Prepare the Patient
- Position the Patient – Have the patient in a seated or semi-reclined position with the head in a neutral, relaxed posture.
- Clean the Skin – Use an antiseptic wipe (e.g., alcohol pad or chlorhexidine) to remove any oils or debris.
- Dry the Skin – Ensure the area is completely dry before marking to prevent ink smudging.
Step 2: Identify Natural Skin Creases and Folds
- Observe the Patient’s Face at Rest – Have the patient relax their facial muscles and look straight ahead.
- Ask the Patient to Make Facial Expressions – Have the patient smile (nasolabial folds, marionette lines).
- Identify RSTLs
- On the cheek, RSTLs typically run obliquely from the nose toward the ear.
- Pinch the skin perpendicular to suspected RSTLs—natural lines should form parallel to the ideal incision line.
- These movements help confirm the natural lines of tension and relaxation.
4. Mark the Nevus and the Incision Site
- Outline the IDN borders using a surgical marker.
- Draw an elliptical incision or a fusiform excision plan with the long axis aligned to RSTLs for minimal tension.
- Ensure 2 mm margins around the IDN to prevent recurrence and be mindful to be conservative to minimize final incision length.
Step 3: Anesthesia and Skin Preparation
- Clean the Area
- Use chlorhexidine or povidone-iodine to ensure sterility.
- Local Anesthesia
- Inject 1% or 2% lidocaine with epinephrine for numbing and hemostasis.
- Allow 3–5 minutes for the anesthetic to take full effect.
Step 4: Make the Incision Along RSTLs
- Use a No. 15 Scalpel Blade
- Make a gentle elliptical or fusiform incision, keeping the long axis parallel to the RSTLs.
- Excise the Nevus Carefully
- Use Metzenbaum scissors or a fine-tipped hemostat to lift and remove the lesion.
- Perform sharp dissection at the dermal plane to ensure complete removal.
Step 5: Achieve Hemostasis and Close the Wound
- Control Bleeding
- Apply light pressure or use electrocautery for any small vessels.
- Wound Closure
- Deep Dermal Layer:
- Use 5-0 or 6-0 absorbable vicryl sutures to reduce tension.
- Epidermal Layer:
- Use dermabond and glu-Stitch (see picture below) if minimal tension present and wound edges approximated well (Note: Alternatively, place 6-0 nylon or polypropylene sutures).
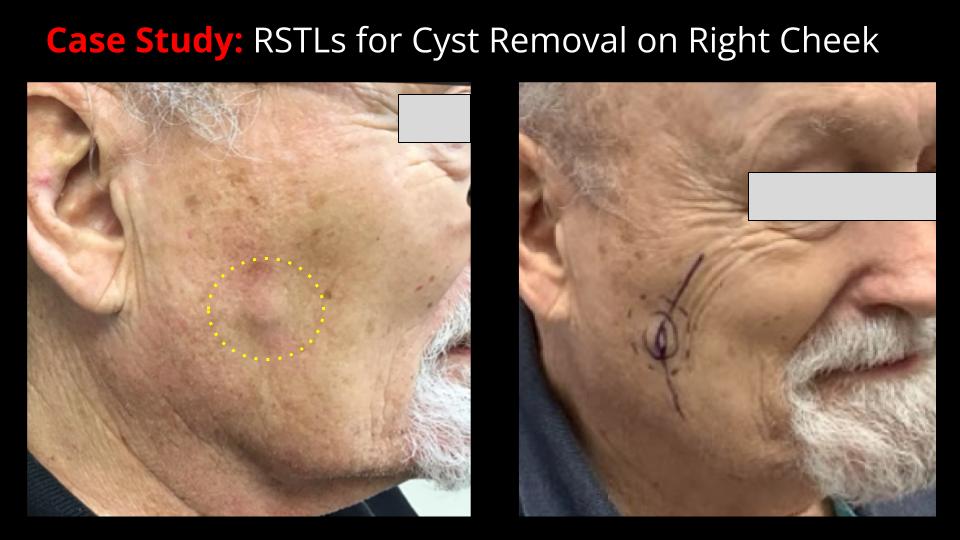
Case Study 2: Slit Incision Cyst Removal
Step 1: Prepare the Patient
- Positioning: Have the patient lying supine with the head slightly elevated. Ensure good lighting and field visibility.
- Skin Preparation: Clean the area with chlorhexidine or povidone-iodine to maintain sterility.
- Anesthesia:
- Inject 1–2% lidocaine with epinephrine (using a 30-gauge needle) around and beneath the cyst to achieve local anesthesia and hemostasis.
- Wait 3–5 minutes for full effect.
Step 2: Identify Resting Skin Tension Lines (RSTLs) and Plan the Incision
- Locate the RSTLs on the right cheek – Again, these typically run obliquely from the nose toward the ear.
- Mark a Small Slit Incision
- Use a surgical marker to outline a 3–5 mm incision along the RSTLs over the center of the cyst.
- The incision should be just large enough to remove the cyst while minimizing scarring.
Step 3: Make the Slit Incision
- Use a No. 11 or No. 15 Scalpel Blade
- Hold the blade at a 15–30° angle and make a precise linear incision along the marked line.
- Incise through the epidermis and dermis until reaching the cyst wall.
- Blunt Dissection of the Cyst Capsule
- Use Metzenbaum scissors or a hemostat to gently separate the cyst from surrounding tissues.
- Take care not to rupture the cyst to prevent spillage of contents.
- Milk the Cyst Out (If Necessary)
- If the cyst is intact but stuck, apply gentle pressure on both sides to express it through the incision.
- If the cyst ruptures, suction out the contents and remove the cyst wall entirely to prevent recurrence.
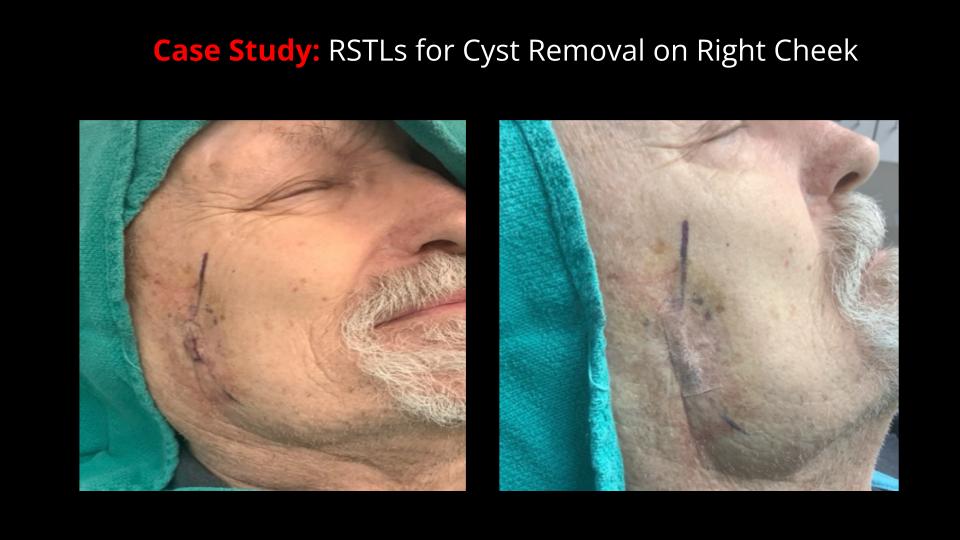
Step 4: Hemostasis and Wound Closure
- Control Bleeding:
- Use light pressure with gauze or electrocautery for hemostasis.
- Minimal Closure or Healing by Secondary Intention:
- Place 5-0 or 6-0 vicryl if the defect is small and tension-free to close dead space (see pic below) and reinforce with Glu-Stitch and steri-strips (Note: Alternatively, place one or two interrupted sutures (6-0 nylon or polypropylene) for cosmetic closure, or allow to heal by second intention if less than 2 mm.
Overall Key Summary Benefits of Using RSTLs for Surgery
In conclusion, utilizing RSTLs for surgical excisions is a game-changer in achieving optimal cosmetic results.
By aligning incisions with these natural skin creases scars heal more discreetly, blending seamlessly with facial contours.
Unlike larger excisions, the slit incision technique shown in the second case study preserves more surrounding tissue, leading to less disruption to healthy skin and a smaller scar.
Whether performing excisions, cyst removals, or other dermatologic procedures, prioritizing RSTLs enhances both aesthetic results and patient satisfaction—an essential approach for any practitioner focused on precision and excellence in skin surgery.
I hope you enjoyed these surgical pearls and you can start applying them to practice right away!
IN-PERSON, FULL-DAY WORKSHOP now opened for dermatology NPs/PAs!
The FULL-DAY, IN-PERSON advanced suturing workshop designed specifically for dermatology NPs/PAs is finally here (7.5 CMEs awarded)!
Because you are part of the SURGICAL DERMATOLOGY NP/PA COMMUNITY, you get first exclusive access!
Here is more info:
🔷 Date: Oct 17, 2025
🔷 Location: Virginia Beach, VA
🔷 CME Credits: Earn 7.5 AAPA Category 1 CMEs (plus an additional 8 CMEs from the FREE online suturing course included!)
💡 What You’ll Learn:
✅ Step-by-step framework for layered elliptical excision closures
✅ How to minimize scarring and improve aesthetic outcomes
✅ Mastering subcuticular & epidermal suturing techniques
✅ Tensioned closures based on anatomic location
✅ How to avoid poor suturing techniques to prevent post-op complications
⏰ Spots are extremely limited! Secure your spot today!
For more information, click on my website for more info! 🔗 https://www.theresapulsedermatology.com/
Serving with GRATITUDE,
Theresa Talens DNP, FNP-C (TheresaSurgDermNP)
Founder of P.U.L.S.E. Dermatology & Procedures, Inc.
Where we believe in Precision. Ultimate Care. Leverage. Skills. Excellence.

